Most people who paint their homes focus mainly on choosing the right colours, but often overlook what truly affects how those colours look and last. A smooth, well-prepared surface is what makes walls look beautiful and long-lasting. That’s where primer comes in; it prepares the surface, ensures smoothness, improves adhesion between layers, and increases the paint’s durability.
Let’s look at why primer is so important for achieving a perfect and professional wall finish.
What is Primer?
Primer is a preparatory coating applied on walls, before and after wall putty, and before paint. Its main purpose is to seal the surface, enhance paint adhesion, improve colour properties, and enhance the final appearance of the paint. It acts as a bridge between the wall and the putty, and between the putty and the paint, ensuring that the paint spreads evenly and adheres firmly for a long-lasting finish.
Made from resins, solvents, and additives, primer penetrates the surface to reduce its porosity. This prevents the plastered wall from absorbing moisture from the putty or paint unevenly, which can otherwise cause chalking or make the colour appear patchy or dull. By creating a sealed and uniform base, primer allows the paint’s true texture and finish to shine through.
Primers can be broadly categorised based on their base type water-based, solvent-based, and oil-based.
- Water-based primers are most commonly used for cementitious and plastered surfaces, especially when followed by emulsion paints.
- Solvent-based primers offer deep penetration and are used for specific performance requirements.
- Oil-based primers are ideal for wooden or metal surfaces, where they prevent rusting or stains from bleeding through the paint.
Why Primer is Essential
A well-applied primer offers multiple benefits that directly influence the performance and finish of paint.

- Improves Paint Adhesion: Helps paint stick firmly to the wall surface, ensuring long-lasting results and preventing issues like peeling or flaking.
- Seals Porous Surfaces: Fills tiny pores in the wall, preventing uneven paint absorption and helping achieve a smoother finish.
- Enhances Paint Colour and Finish: Ensures the paint’s true shade appears bright, uniform, and consistent across the wall.
- Prevents Stains and Dampness: Forms a protective barrier that resists moisture, stains, and efflorescence, especially in humid conditions.
- Increases Paint Durability: Provides a strong base layer that helps paint resist daily wear and tear, extending its lifespan.
- Reduces Paint Consumption: Prevents excessive paint absorption, reducing the number of coats needed and saving both time and money.
- Ensures Even Application: Levels out surface irregularities, allowing the final coat of paint to spread smoothly without patches or streaks.
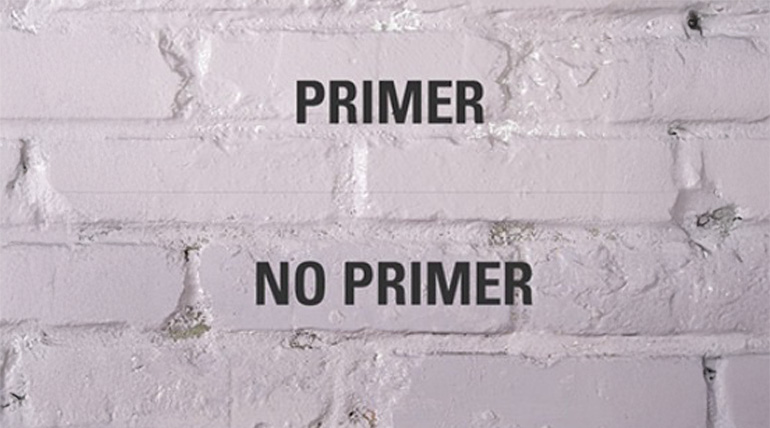
- Essential for a Professional Finish: Skipping primer can compromise the final look. A well-primed wall ensures a cleaner, more refined, and durable finish.
How to Apply Primer for Best Results
To achieve the perfect finish, surface preparation and application technique are as important as product selection.
- Surface Preparation:
Ensure the surface is clean, dry, and free from dust, grease, or loose particles. Repair cracks or holes and allow them to dry completely before applying primer. - Mixing and Dilution:
Most primers are supplied as concentrated emulsions. They should be diluted with clean water in the right ratio generally around 600–700 ml of water per litre of primer for smooth and even coverage. - Application Tools:
Use a brush or roller for best results. A roller ensures faster coverage and uniform spreading, while a brush can be useful for edges and corners. - Drying Time:
Allow the first coat to dry completely usually within one hour, before applying the next coat of putty or paint. The surface should be re-coatable after 6 hours for maximum adhesion and durability. - Coverage:
Depending on surface type and porosity, primer coverage typically ranges between 70–100 sq. ft. per litre per coat. - Finishing and Topcoat:
Once the primer is dry, lightly sand the surface to remove minor unevenness. Then proceed with the desired paint or finish coat.
Storage, Handling, and Safety Tips
- Store primer in a cool, dry, and well-ventilated area, away from heat and direct sunlight.
- Shake the container well before use and keep it tightly closed when not in use.
- Always check that the wall moisture content is below 12% and that the surface pH is slightly alkaline before application.
- Avoid inhaling vapours or direct skin contact; wear gloves and protective eyewear during use.
- In case of contact, wash with plenty of water and seek medical help if irritation occurs.
- Dispose of containers responsibly.
- Most modern primers, including HomeSure products, are free from added lead, mercury, and chromium compounds, making them safe for home environments.
Choosing the Right Primer
The type of primer you choose depends on your surface and purpose:
- Interior walls require primers that provide whiteness, smoothness, and uniformity, helping enhance the richness of interior paints.
- Exterior walls need weather-resistant primers that offer protection from moisture, sunlight, and dust while maintaining adhesion over time.
A good primer also reduces the need for multiple paint coats, resulting in savings without compromising finish quality. Investing in the right primer upfront ensures both the beauty and longevity of your walls.
Walplast’s HomeSure Range of Primers
At Walplast, the HomeSure range is built on the company’s commitment to high performance, durability, and cost efficiency. Catering to both professional painters and homeowners, the range offers two distinct product lines to suit different needs and budgets.
- Premium Range – HomeSure Mastertouch Interior & Exterior Primer
For those who prefer a premium finish, Walplast offers the HomeSure Mastertouch Interior Primer and HomeSure Mastertouch Exterior Primer.
These high-quality primers provide exceptional whiteness, superior adhesion, and excellent coverage.
- The Interior Primer ensures a smooth matte finish, improved topcoat adhesion, and consistent colour brightness.
- The Exterior Primer is designed for long-term weather resistance, offering superior protection against moisture, UV rays, and surface cracking.
Both variants are formulated for easy application, high coverage (up to 100 sq. ft. per litre), and quick drying making them ideal for professionals aiming for flawless and lasting finishes.
- Affordable Range – HomeSure Mastertouch Prime Interior & Exterior Primer
For those seeking quality on a budget, the HomeSure Mastertouch Prime Interior Primer and HomeSure Mastertouch Prime Exterior Primer offer outstanding performance at an economical price.
They provide good opacity, whiteness, and adhesion while ensuring a smooth, even base coat for paint application.
- The Prime Interior Primer enhances smoothness and paint brightness in indoor spaces.
- The Prime Exterior Primer offers durable surface protection and improved topcoat life for exterior walls.
Both options are water-based, easy to apply, and safe for home use making them ideal for cost-conscious homeowners who don’t want to compromise on results.
Conclusion
Primer is the foundation of every long-lasting and beautiful wall finish. It plays a crucial role in ensuring that paint adheres better, looks brighter, and lasts longer. By sealing the surface and balancing wall porosity, primer prevents issues like peeling, patchiness, and fading, while also enhancing colour vibrancy and offering protection from dampness and stains.
At Walplast, the HomeSure range of primers is designed to meet every requirement from premium finishes with Mastertouch Interior and Exterior Primers, to affordable yet high-performing solutions with Mastertouch Prime Interior and Exterior Primers.
So, whether you’re painting your dream home or giving your walls a fresh touch, remember a strong, lasting wall begins with the right primer. Choose wisely, prepare well, and let every coat of paint truly shine.